PERSONALIZING YOUR CARD--Adding a Photo
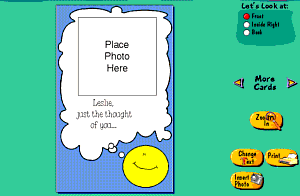
Some cards are designed especially for adding a photograph. As you browse through the card choices, you see some cards with a blank area. When you select this card, you can add a photograph that you saved previously. Or, you can add a photo directly from a scanner or digital camera.
Adding a Photo Using a Scanner or Digital Camera
- Click CARDS on the Activity screen, click ADD-A-PHOTO, then choose a category and a card.

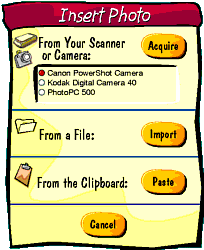
- Click INSERT PHOTO on the Preview screen. The Insert Photo screen appears. Your scanner or digital camera is listed.

- Click the scanner or digital camera device you want to use, then click ACQUIRE to add a photo directly from the scanner or camera. Your scanner or digital camera software takes over until the photo is added to the card.
Adding a Photo from a File
You can import several file types into CreataCard Special Edition: BMP, FPX, JPEG, PCD, PCX, PNG, PSD, TGA, and WPG.
- Click CARDS on the Activity screen, click ADD-A-PHOTO, then choose a category and a card.

- Click INSERT PHOTO on the Preview screen. The Insert Photo screen appears.

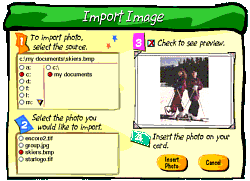
- Click IMPORT to add a photo you saved previously. The Import screen appears.

- Select the drive and folder containing your file. If you are using a photo CD, remember to place the CD in the drive, then select the drive (usually D:).
- Select the file. If you would like to display a preview of the file, click the CHECK TO SEE PREVIEW box.
- Click DONE. The photo is pasted into the blank area on the card.
Adding a Photo from the Clipboard
- Click CARDS on the Activity screen, click ADD-A-PHOTO, then choose a category and a card.
- Click INSERT PHOTO on the Preview screen. The Insert Photo screen appears.
- Click PASTE to add a photo you copied to the Clipboard. The photo is pasted into the blank area on the card.


